Deploying your Spring Boot application on AWS Beanstalk via CLI
First of all, you should have an AWS account. If you don’t have one, please go ahead and create one — you get many of the AWS services for free for ~12 months when you create a new fresh AWS account.
Create a spring boot app from https://start.spring.io/ or via running the below command
curl https://start.spring.io/starter.zip -d dependencies=web,devtools \
 -d bootVersion=2.1.9.RELEASE -o my-project.zip
Unzip the file
unzip my-project.zip
Open the project on your IDE and add a controller class
package com.example.demo;

import org.springframework.web.bind.annotation.GetMapping;
import org.springframework.web.bind.annotation.RestController;

@RestController
public class HelloController {

    @GetMapping("/hello")
    public String hello() {
        return "Hello World!";
    }
}
Compile and Run the application
./mvnw clean package
./mvnw spring-boot:run
Open the browser at http://localhost:8080/hello and you should see a message as below

Wow! You have got you spring boot app running in local
Now let’s see how to deploy your service to AWS Beanstalk, so that you can get to see you app on the internet. Isn’t that cool?
You have two ways to deploy the application to AWS Beanstalk. 1) via AWS console 2) via command line using AWS Beanstalk CLI.
We are programmers and we like command line, so we will go with option 2) via CLI :)
Download and install the CLI from https://github.com/aws/aws-elastic-beanstalk-cli-setup
Once you have CLI installed, first step is to initialise the project with Elastic Beanstalk. Run eb init under the root folder of your application and select appropriate details as shown below.
eb initSelect a default region1) us-east-1 : US East (N. Virginia)2) us-west-1 : US West (N. California)3) us-west-2 : US West (Oregon)4) eu-west-1 : EU (Ireland)5) eu-central-1 : EU (Frankfurt)6) ap-south-1 : Asia Pacific (Mumbai)7) ap-southeast-1 : Asia Pacific (Singapore)8) ap-southeast-2 : Asia Pacific (Sydney)9) ap-northeast-1 : Asia Pacific (Tokyo)10) ap-northeast-2 : Asia Pacific (Seoul)11) sa-east-1 : South America (Sao Paulo)12) cn-north-1 : China (Beijing)13) cn-northwest-1 : China (Ningxia)14) us-east-2 : US East (Ohio)15) ca-central-1 : Canada (Central)16) eu-west-2 : EU (London)17) eu-west-3 : EU (Paris)18) eu-north-1 : EU (Stockholm)19) eu-south-1 : EU (Milano)20) ap-east-1 : Asia Pacific (Hong Kong)21) me-south-1 : Middle East (Bahrain)22) af-south-1 : Africa (Cape Town)(default is 3): 3Select an application to use1) [ Create new Application ](default is 1): 1Enter Application Name(default is "my-project"):Application my-project has been created.Select a platform.1) .NET Core on Linux2) .NET on Windows Server3) Docker4) GlassFish5) Go6) Java7) Node.js8) PHP9) Packer10) Python11) Ruby12) Tomcat(make a selection): 6Select a platform branch.1) Corretto 11 running on 64bit Amazon Linux 22) Corretto 8 running on 64bit Amazon Linux 23) Java 8 running on 64bit Amazon Linux4) Java 7 running on 64bit Amazon Linux(default is 1): 1Cannot setup CodeCommit because there is no Source Control setup, continuing with initializationDo you want to set up SSH for your instances?(Y/n): n
You might be asked for the Access Key Id and Secret Access Key in the above step. If you don’t have it handy, you can create them by login to AWS console and going to My Account -> My Security Credentials. Click on “Create New AccessKey”

Beanstalk Initialisation creates .elasticbeanstalk/config.yml file.
Modify the file to add deployment details (last two lines in the file)
branch-defaults:  default:    environment: null    group_suffix: nullglobal:  application_name: my-project  branch: null  default_ec2_keyname: null  default_platform: Corretto 11 running on 64bit Amazon Linux 2  default_region: us-west-2  include_git_submodules: true  instance_profile: null  platform_name: null  platform_version: null  profile: eb-cli  repository: null  sc: null  workspace_type: Applicationdeploy:
  artifact: target/demo-0.0.1-SNAPSHOT.jar
Finally we are going to create our environment by running the below command.
(IMPORTANT: Always run with -s as show below, otherwise a load balancer will be created for your application which comes with extra cost.)
eb create -s
Enter Environment Name(default is my-project-dev):Enter DNS CNAME prefix(default is my-project-dev):Would you like to enable Spot Fleet requests for this environment? (y/N): nUploading: [##################################################] 100% Done...Environment details for: my-project-devApplication name: my-projectRegion: us-west-2-------------------------2020-11-02 12:01:11 INFO Waiting for EC2 instances to launch. This may take a few minutes.2020-11-02 12:01:15 INFO Instance deployment successfully detected a JAR file in your source bundle.2020-11-02 12:01:16 INFO Instance deployment successfully generated a 'Procfile'.2020-11-02 12:01:18 INFO Instance deployment completed successfully.
Spring boot by default starts on port 8080 while Beanstalk uses port 5000. so you need to override the spring boot port with environment variable SERVER_PORT as follows
eb setenv SERVER_PORT=5000
Once done check the status of your app
eb status
Environment details for: my-project-devApplication name: my-projectRegion: Deployed Version: app-201103_073438Environment ID: Platform: arn:aws:elasticbeanstalk:us-west-2::platform/Corretto 11 running on 64bit Amazon Linux 2/3.1.2Tier: WebServer-Standard-1.0CNAME: my-project-dev.{region}.elasticbeanstalk.comUpdated: 2020-11-03 02:05:17.249000+00:00Status: ReadyHealth: Green
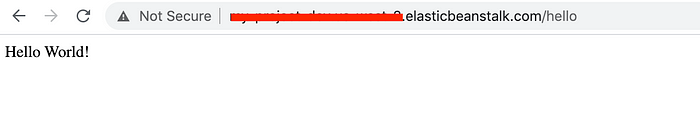
Use the CNAME to access your app. Open the browser at http://CNAME/hello and you should see your app online. Time to celebrate !!
You can login to AWS console and go to Elastic Beanstalk service and you should see the same environment created there.
Thank you for reading through.
